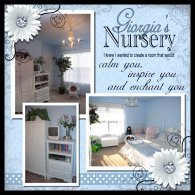
If you’re like me, you want to do your nursery but are not yet ready to commit to a theme. Afraid that you are going to change your mind next week, next month, or next year? Me too. Okay, I figured it out. At least, I figured it out for me and thought I would share with you.
When I think of my daughter’s room, what do I envision? I thought…GIRLY! What is GIRLY anyway? There are so many different things that are girly. So, I need to define GIRLY. GIRLY for me means sparkly! OK. It’s a start, and don’t think I didn’t contemplate HEAVILY on mixing glitter in my faux finish glaze! LOL. So, how do I make my daughter’s room sparkly. Then it hit me, I want one of those chandelier’s that I sometimes see in little girls rooms. That’s it! So, that was my starting point.
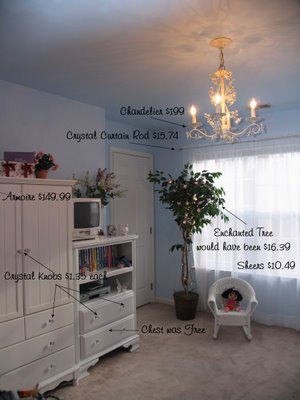
I have always found that in each room that I decorate, there seems to be one main focal point. I figured that this will be Giorgi’s. I also decided that since the chandelier was going to be the focal point,this will be the one item that I will splurge on. It’s the one thing that will be totally unique about her room, and I will design her room around it. Easy enough…right. My budget allowed me $200 for this. Have you priced chandeliers recently? This was not going to fit into my plan. Anyway, I searched on and off for the perfect chandelier for about 4 months. Then, I found THE ONE. I was in love before I even looked at the price. $199 and free shipping. Was that a sign or what!
Okay, so back to the room. Since the chandelier had little crystal flowers on it, I was thinking garden theme.
Themes
I imagined every garden theme imaginable, even butterflies and ladybugs. My daughter would not be a baby-baby so I wanted a theme that would grow with her. I wanted to paint a beautiful mural on the wall. But after I paint the beautiful mural, it’s never going away. LOL. What if she ends up hating it and wants Dora on the wall. NO. So, I ruled out the mural. (Love Dora, just not on the wall). So, I want pretty neutral walls. I then decided to go with a faux sky. It’s cheery, serene, soft, and kind of shabby chic and of course, the chandelier would look fantastic against it. Done. Plus, in the future I can change the look of the room with accents. I don’t have to commit to a “THEME” per say.
Color
Paint is going to give you the biggest bang for your buck. It’s cheap and easy. I highly recommend painting your ceiling. It gives off a very finished look. Even consider a border as an accent instead of wallpaper. I am not a very big fan of wallpaper if you ever want to remove it, it is nerve wracking!
The best finishes to consider for children’s wall are satin, semi-gloss or eggshell indoor latex paint. Smudges of dirt will wipe right off with a damp cloth and some mild soap. You might be able to get away with a flat paint, but only in a room where the child will primarily be sleeping and not playing.
Spend the extra time prepping the room. You know, taping the woodwork and other stuff for clean lines. Time has been my best friend. I have the luxury of having lots of time to do all of this without catering to the needs of a family. My pooch Pirate is very low maintenance. But when it comes to to saving money – you can do it too.
Furniture
A must have for me was a white armoire. I didn’t mind if I have to refinish one, just needed one. I found mine at Kmart for $149.99 with no tax. Delaware has no sales tax. Yahoo. Anyway, it’s not as sturdy as I would have liked, but for the price I am definitely not complaining.
As you know, I am going with a white furniture theme. I began looking for a crib. There are just way too many to choose from. Is my daughter going to use a crib or co-sleep? How old are children when they outgrow the crib? All of these questions were swirling around in my head. Hmmmm. Ok, here is my take. I want a crib and I hope she sleeps in it. I will co-sleep if I have to. So, do I want to put a chunk of money into a crib that she might never even use? Not really. As luck would have it, a member of my freecycle group offered a white crib to me and a friend gave me her crib mattress. DONE.
*NOTE: The National Safety Council explains things to consider when buying a crib: http://www.nsc.org/library/facts/cribtips.
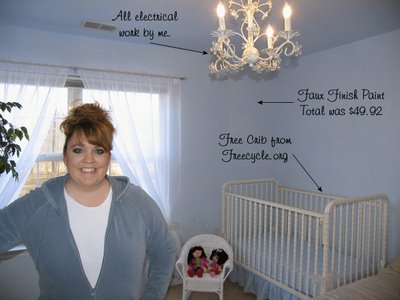
I already have a full size bed in this room since it was the craft/guest room. I am not a fan of toddler beds. So, it stays. I am thinking…before I do the co-sleeping thing, I would sleep in the full size bed with the crib scooted up lengthwise beside the bed. It’s sort of an in between concept.
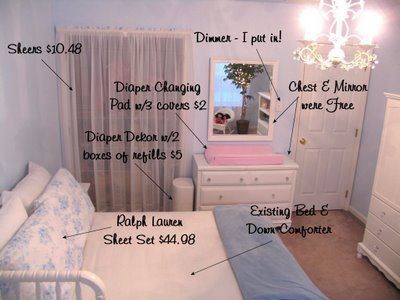
Other furniture? Look for dual functional furniture, instead of a changing table, find a dresser that you can place a changing pad on. Put all of the diapering necessities in the top drawer. So I needed a few more pieces, so I decided to look at garage sales, thrift stores, or freecycle.org to buy pieces to refinish. As my luck would have it, my boss at my second job offered me her daughter’s furniture. Her daughter is all grown up and out of the house. The furniture is around 27 years old but good stuff. I was jumping for joy. Sight unseen – I knew I could make it awesome. So, I got it and it looks awesome. You can refinish any piece of furniture and make it great. *NOTE: Do make sure anything you buy secondhand complies with current child safety requirements.
I don’t stain furniture…too much work. PAINT! Paint is cheap. Okay, I know that stained pieces are beautiful, but my budget screams PAINT. When refinishing…I cheat. I am NOT sanding. Use BIN primer and it bonds to anything. Then paint. At least two coats and let dry thoroughly!! I picked a high gloss. It was the look that I was going for. This way it can be easily cleaned as well.
If you have a bunch of non matching pieces, after you paint them, tie them together a little more, by switching out the hardware. I found my crystal knobs online for a fraction of the cost of Lowe’s or Home Depot.
Safety - Older furniture is much sturdier for child use and don’t forget to anchor to walls. One of my friends cousins little boy was climbing a dresser when it fell on him and was severely injured. He needs a nurse 24/7. It is devastating for the family. So, this is one thing that I am adamant about….securing the furniture in the nursery. I am considering it with a few other pieces in my house. The price is so minimal.
Don't forget a place for you to sit in the nursery. Pick a comfortable chair. You'll be spending many nights there with your baby, reading her stories or rocking her to sleep. I don’t have one yet. I’m working on it.
Window Treatments
Window treatments are a place where you can really save money by doing the work yourself or buy very inexpensive one. Luckily for me, I wanted sheers and they seem to be the cheapest. I found them at Value City. Some have told me that it's very inexpensive to make them with cute fabric or even using twin sheets.
*NOTE: Make sure to use those safety gadgets to wind up blinds.
Storage
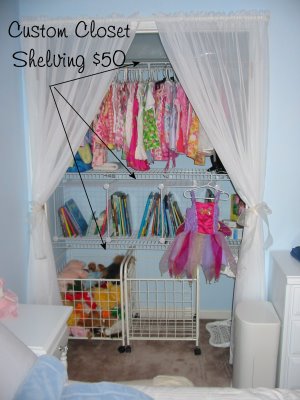
Find a way to create lots of storage space. You'll probably need more room than you think. Once the clothes get bigger and are joined by shoes and other accessories, you'll need every inch of closet space you can get. Not to mention a place to put all those toys! For extra storage, I did custom closets with adjustable shelves to grow with my daughter. I have the armoire and dresser, plus those under the bed containers and 2 Rubbermaid containers hidden underneath the crib.
Accents
Buy inexpensive accents to pull the room together. I have my enchanted twinkle tree in my room. I think the total cost was less than $30. I personally don’t want a lot of stuff on the walls, I prefer the simplicity. Some rooms over stimulate me; this is what I am trying to avoid. It’s not for everyone though. Do what makes you happy.
Inexpensive ways to accent would be to frame pictures from children's books for inexpensive art they'll love. You can find books at thrift stores or garage sales for pennies. This is also a good way to use books if baby has eaten a couple of pages but you don't want to throw them away!
Okay, I this is how I saved money on my nursery.
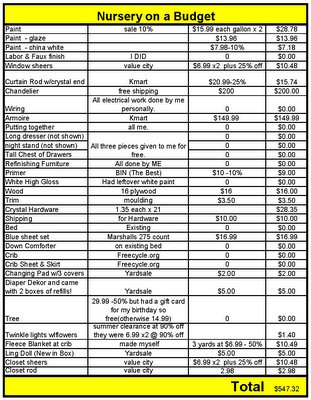
If you have trouble reading this chart, the best way to view it is if you click on it. It will take you to a separate page. Once there, scroll your mouse over it and in the left top corner print options will appear and in the bottom right corner a photobox with a bunch of arrows will appear. click on this photo box and it will enlarge to a nice "viewable" size.


